Ubuntu에 SVN Server를 설치해보자!
Ubuntu에 SVN Server를 설치해보자!
Subversion 설치
SVN Server 설치를 위해서는 다음 명령어를 터미널에 입력해야 합니다.
1
sudo apt install subversion
원하는 위치에 SVN Folder 생성
이제 원하는 위치로 이동합니다.
1
cd /path/example1
원하는 위치에서 밑의 명령어를 입력합니다.
1
sudo svnadmin create project1
이렇게 명령어를 치면 /path/example 밑에 project1 폴더가 생성되는 것을 볼 수 있습니다.
해당 폴더로 들어가 줍니다.
1
cd /path/example1/project1
SVNServer 환경 설정
svnadmin create로 만든 project1 폴더의 초기 구성은 밑과 같습니다.
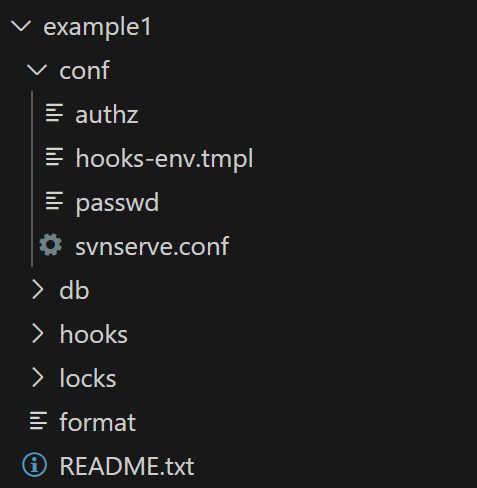
우리가 건드려야 할 중요한 부분은 conf 폴더 밑에 있는 svnserve.conf, passwd, authz 3개의 파일입니다.
svnserve.conf설정
초기의 svnserve.conf 파일을 열어보시면 꽤 긴 글을 보실 수 있습니다.
그러나 당황하지 말고 딱 4부분의 주석만 풀어주면 됩니다.
1
2
3
4
5
6
7
8
9
10
11
12
13
14
15
16
17
18
19
20
21
22
23
24
25
26
27
28
29
30
31
32
33
34
35
36
37
38
39
40
41
42
43
44
45
46
47
48
49
50
51
52
53
54
55
56
57
58
59
60
61
62
63
64
65
66
67
68
69
70
71
72
73
74
75
76
77
78
79
80
81
82
### This file controls the configuration of the svnserve daemon, if you
### use it to allow access to this repository.  (If you only allow
### access through http: and/or file: URLs, then this file is
### irrelevant.)

### Visit http://subversion.apache.org/ for more information.

[general]
### The anon-access and auth-access options control access to the
### repository for unauthenticated (a.k.a. anonymous) users and
### authenticated users, respectively.
### Valid values are "write", "read", and "none".
### Setting the value to "none" prohibits both reading and writing;
### "read" allows read-only access, and "write" allows complete
### read/write access to the repository.
### The sample settings below are the defaults and specify that anonymous
### users have read-only access to the repository, while authenticated
### users have read and write access to the repository.
anon-access = read
auth-access = write
### The password-db option controls the location of the password
### database file.  Unless you specify a path starting with a /,
### the file's location is relative to the directory containing
### this configuration file.
### If SASL is enabled (see below), this file will NOT be used.
### Uncomment the line below to use the default password file.
password-db = passwd
### The authz-db option controls the location of the authorization
### rules for path-based access control.  Unless you specify a path
### starting with a /, the file's location is relative to the
### directory containing this file.  The specified path may be a
### repository relative URL (^/) or an absolute file:// URL to a text
### file in a Subversion repository.  If you don't specify an authz-db,
### no path-based access control is done.
### Uncomment the line below to use the default authorization file.
authz-db = authz
### The groups-db option controls the location of the file with the
### group definitions and allows maintaining groups separately from the
### authorization rules.  The groups-db file is of the same format as the
### authz-db file and should contain a single [groups] section with the
### group definitions.  If the option is enabled, the authz-db file cannot
### contain a [groups] section.  Unless you specify a path starting with
### a /, the file's location is relative to the directory containing this
### file.  The specified path may be a repository relative URL (^/) or an
### absolute file:// URL to a text file in a Subversion repository.
### This option is not being used by default.
# groups-db = groups
### This option specifies the authentication realm of the repository.
### If two repositories have the same authentication realm, they should
### have the same password database, and vice versa.  The default realm
### is repository's uuid.
# realm = My First Repository
### The force-username-case option causes svnserve to case-normalize
### usernames before comparing them against the authorization rules in the
### authz-db file configured above.  Valid values are "upper" (to upper-
### case the usernames), "lower" (to lowercase the usernames), and
### "none" (to compare usernames as-is without case conversion, which
### is the default behavior).
# force-username-case = none
### The hooks-env options specifies a path to the hook script environment
### configuration file. This option overrides the per-repository default
### and can be used to configure the hook script environment for multiple
### repositories in a single file, if an absolute path is specified.
### Unless you specify an absolute path, the file's location is relative
### to the directory containing this file.
# hooks-env = hooks-env

[sasl]
### This option specifies whether you want to use the Cyrus SASL
### library for authentication. Default is false.
### Enabling this option requires svnserve to have been built with Cyrus
### SASL support; to check, run 'svnserve --version' and look for a line
### reading 'Cyrus SASL authentication is available.'
# use-sasl = true
### These options specify the desired strength of the security layer
### that you want SASL to provide. 0 means no encryption, 1 means
### integrity-checking only, values larger than 1 are correlated
### to the effective key length for encryption (e.g. 128 means 128-bit
### encryption). The values below are the defaults.
# min-encryption = 0
# max-encryption = 256
주석 푼 부분의 옵션을 설명해드리겠습니다.
anon-access의 경우 모르는 사용자의 경우 어떻게 할 것인가를 지정할 수 있습니다.
read로 설정되어 있는 경우, 계정이 없더라도 이 SVN 폴더에 접근해 읽을 수 있습니다.그러나 커밋을 시도할 경우 계정을 입력해야 합니다.
모르는 사용자가 이 SVN 폴더에 접근해 읽는 것도 방지하고 싶은 경우 옵션 값을none로 설정하면 SVN 폴더를 체크아웃 받을 때, 계정을 입력해야 합니다.auth-access의 경우 계정이 있는 사용자의 경우 어떻게 할 것인가를 지정할 수 있습니다.
계정이 있는 사용자의 경우 당연히 쓰기가 되어야 겠죠?write옵션 값을 유지합시다.password-db의 옵션으로passwd를 사용할 경우 사용자 계정의 이름과 대응하는 비밀번호를passwd파일에서 설정할 수 있습니다.authz-db의 옵션으로authz를 사용할 경우 계정들의 권한과 그외 모든 계정들의 권한 설정을authz파일에서 설정할 수 있습니다.
passwd파일 설정 이 파일에서는 해당 SVN 폴더에서 사용할 수 있는 계정과 대응하는 비밀번호를 설정할 수 있습니다.
밑에처럼{계정} = {비밀번호}를 입력하면 됩니다.
1
2
3
4
5
6
7
8
9
### This file is an example password file for svnserve.
### Its format is similar to that of svnserve.conf. As shown in the
### example below it contains one section labelled [users].
### The name and password for each user follow, one account per line.

[users]
# harry = harryssecret
# sally = sallyssecret
test1 = test1
authz파일 설정 이 파일에서는 해당 SVN 폴더에서 계정들이 접근할 수 있는 권한을 설정할 수 있습니다.
이 부분은 밑의 예시들을 보는 것이 이해하기 편함으로 밑의 한글로 된 주석 설명을 봐주기를 부탁드립니다.
1
2
3
4
5
6
7
8
9
10
11
12
13
14
15
16
17
18
19
20
21
22
23
### This file is an example authorization file for svnserve.
### Its format is identical to that of mod_authz_svn authorization
### files.
### As shown below each section defines authorizations for the path and
### (optional) repository specified by the section name.
### The authorizations follow. An authorization line can refer to:
###  - a single user,
###  - a group of users defined in a special [groups] section,
###  - an alias defined in a special [aliases] section,
###  - all authenticated users, using the '$authenticated' token,
###  - only anonymous users, using the '$anonymous' token,
###  - anyone, using the '*' wildcard.
###
### A match can be inverted by prefixing the rule with '~'. Rules can
### grant read ('r') access, read-write ('rw') access, or no access
### ('').

[/] # 해당 SVN 폴더의 모든 폴더에 접근할 수 있는 권한을 다룹니다.
test1 = rw # test1 계정으로 접근할 경우 모든 폴더에 쓰기 및 읽기가 가능합니다.

[project1:/example1] # project1의 example1 폴더 밑의 모든 폴더에 접근할 수 있는 권한을 다룹니다.
* = r # 계정이 없는 유저 포함 모든 유저들이 example1 폴더에 접근할 경우 읽기만 가능합니다.
이렇게 원하는 대로 폴더(하위 폴더 포함)에 읽기 및 쓰기 권한을 계정에게 부여할 수 있습니다.
물론 계정이 없는 유저 포함 모든 유저들을 대상으로 권한 설정도 가능합니다.
이제 설정은 다 끝났습니다! 이제 실제로 실행시켜볼까요?
SVN 서버 실행!
밑의 명령어를 입력해 줍시다. 만약 현재 SVN 폴더 경로가 /path/example1/project1이라면 반드시 바로 상위 폴더인 /path/example1을 파라미터로 넣어 밑의 명령어를 실행해줍시다.
1
sudo svnserve -d -r /path/example1
이렇게 하면 SVNServer 가 실행됩니다!
실제 잘 작동하고 있는지 확인하고 싶으시다면, 밑의 명령어를 실행해보면 알 수 있습니다.
1
sudo netstat -ntlp | grep svn
다음과 같이 서버가 데몬으로 동작하고 있는 것을 확인할 수 있습니다!
